## How to Bleed Brake System in a Car with ABS
Bleeding brakes is a relatively simple task that can be performed at home with a few basic tools. However, if your car has an anti-lock braking system (ABS), there are a few additional steps you need to take.
### Tools You Will Need
* Brake fluid
* Brake bleeding kit
* 10mm wrench
* 8mm wrench
* Clear tubing
* Rags
### Step-by-Step Instructions
**Safety First!** Before you begin bleeding your brakes, make sure the car is parked on a level surface and the parking brake is engaged.
**1. Gather Your Tools and Materials**
Make sure you have all of the tools and materials you will need before you begin.
**2. Check the Brake Fluid Level**
The first step is to check the brake fluid level. The brake fluid reservoir is typically located under the hood, near the firewall. The fluid level should be between the “MIN” and “MAX” marks on the reservoir. If the fluid level is low, add brake fluid until it reaches the “MAX” mark.
**3. Identify the Bleeder Screws**
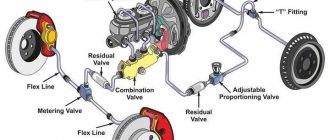
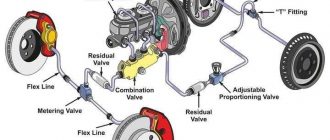
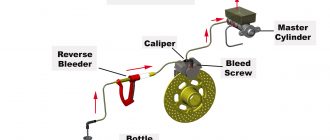
The bleeder screws are located on the calipers or wheel cylinders. There is one bleeder screw for each wheel. The bleeder screws are usually covered with a rubber cap.
**4. Attach the Bleeding Kit**
The bleeding kit consists of a clear tube and a bottle. The clear tube is attached to the bleeder screw, and the bottle is used to collect the old brake fluid.
**5. Open the Bleeder Screw**
Use an 8mm or 10mm wrench to open the bleeder screw. The screw should be turned counterclockwise. Be careful not to overtighten the bleeder screw.
**6. Pump the Brake Pedal**
Have an assistant pump the brake pedal several times. As the brake pedal is pumped, you will see old brake fluid flowing out of the bleeder screw and into the bottle.
**7. Close the Bleeder Screw**
When the old brake fluid has been replaced with new brake fluid, close the bleeder screw. The screw should be turned clockwise until it is snug.
**8. Repeat Steps 5-7 for Each Wheel**
Repeat steps 5-7 for each of the remaining wheels.
**9. Check the Brake Fluid Level**
After you have bled all of the brakes, check the brake fluid level again. If the fluid level is low, add brake fluid until it reaches the “MAX” mark.
**10. Test the Brakes**
Once you have bled the brakes, test them to make sure they are working properly. Drive the car in a safe area and apply the brakes several times. The brakes should feel firm and responsive.
### Tips
* If you have a lot of air in your brake lines, you may need to bleed the brakes several times.
* Be careful not to overtighten the bleeder screws. If you do, you could damage the calipers or wheel cylinders.
* If you are not comfortable bleeding your brakes yourself, you can take your car to a mechanic.
### Troubleshooting
If you are having trouble bleeding your brakes, there are a few things you can check:
* Make sure that the bleeder screws are open.
* Make sure that the clear tube is attached to the bleeder screw and the bottle.
* Make sure that the assistant is pumping the brake pedal hard enough.
* If you are still having trouble, you may need to take your car to a mechanic.
Bleeding brakes is a relatively simple task, but it is important to do it correctly. If you are not sure how to bleed your brakes, consult a mechanic.


